Installation
⚙️ Installation Instructions
| Step | Description |
|---|---|
| 1 | Visit the Intranet Design 5 – SharePoint Designs listing on Microsoft AppSource and click Get it now.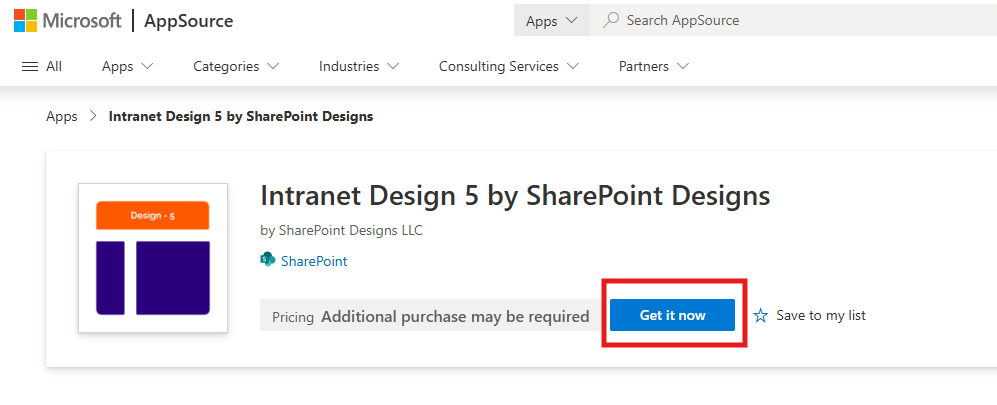 |
| 2 | You will be redirected to the SharePoint Store. Click Add to Apps Site to add it to your tenant.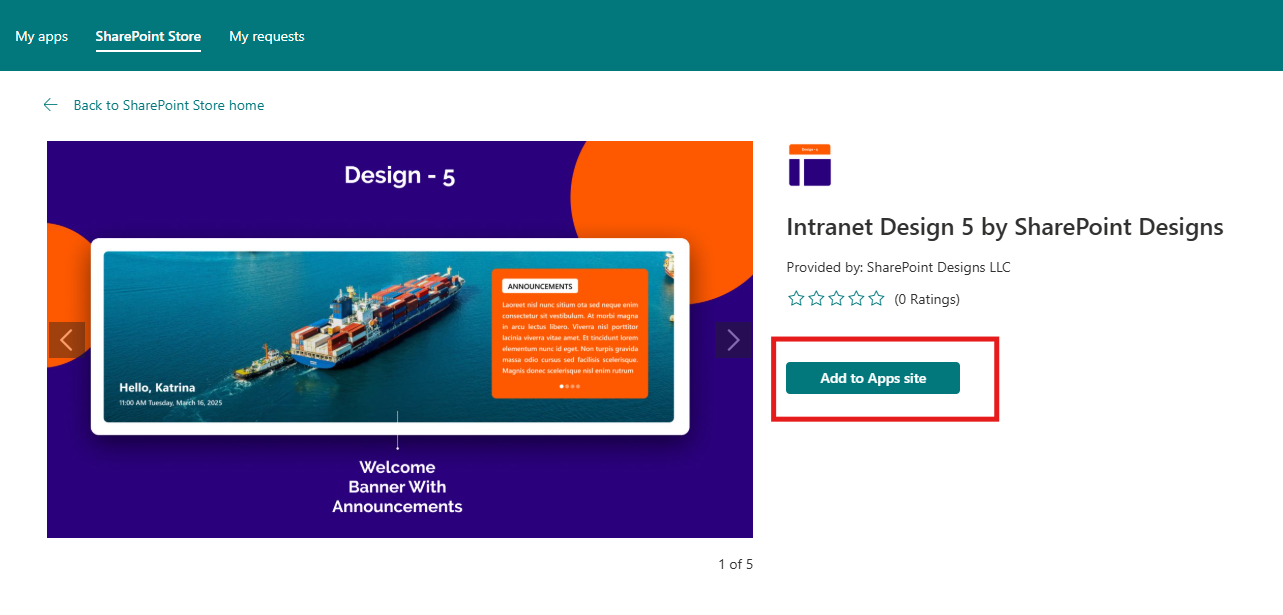 ⚠️ If you don't have permission, a popup will appear saying "App requires permission approval." A request will be raised, and your tenant administrator needs to approve it before the app can be added. |
| 3 | Navigate to your modern SharePoint site, click the Settings (gear) icon → select “Add an app”.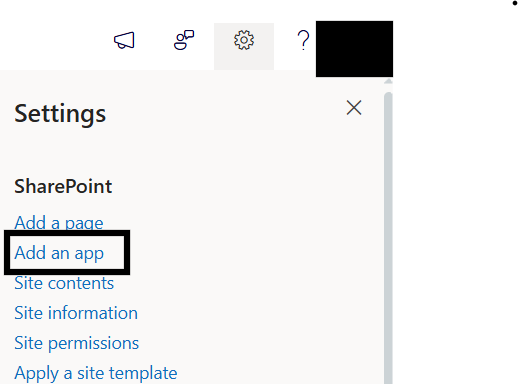 |
| 4 | Choose Intranet Design 5 by SharePoint Designs.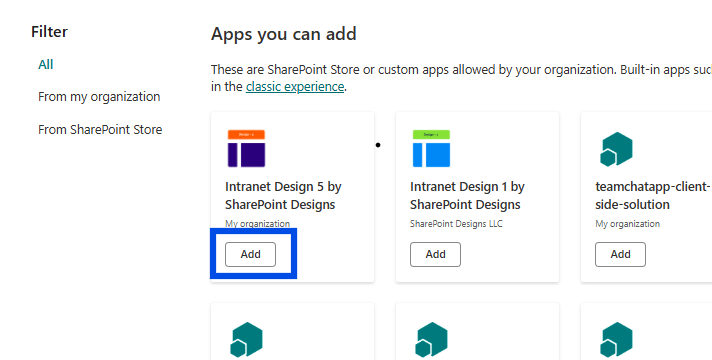 |
| 5 | Click Add. |
| 6 | Confirm installation by checking under Site Contents. |
🧪 Testing Instructions
Note: A free 15-day trial starts automatically when you apply the template.
Steps to Test and Apply Template
-
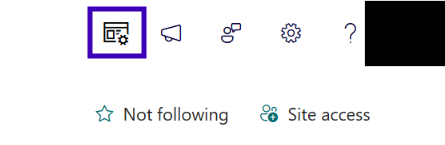
On the SharePoint site, locate the new icon in the top command bar (on the right side of the header bar). This icon opens the design template panel.
-
Click the icon to open the Design 5 Logo Settings Panel.
-
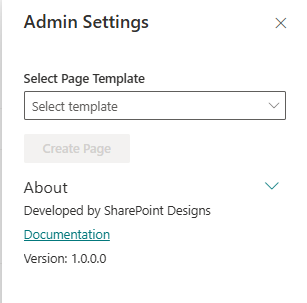
In the panel:
- Select the "Home Page" template
- Click the Create Page button

-
Do not close or refresh the browser. A pop-up will appear to create the required lists and libraries:
Quick LinkslistAnnouncementListlistWelcome BannerlibraryEvent Flyerlibrary (Mock items are added automatically for Announcements, News, QuickLinks, and Events.)
-
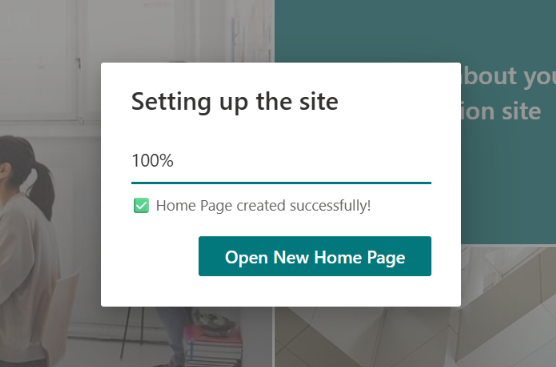
After the items are created, the site page will refresh automatically, and it will continue to creating page and adding webparts.
-
Once setup is complete, a button will appear to open the newly created homepage. Click it to view the result.
🔑 Activating a License Key
After your trial ends, a valid license key is required to continue.
License Activation Steps
| Step | Action | Details / Notes |
|---|---|---|
| 1 | Go to the Home page | Open the SharePoint page where the Design 5 template was applied. |
| 2 | Open activation panel | - If trial expired, click the "Activate" button from the panel. - If still active, go to Edit Page → open Web Part panel → click "Activate License".  |
| 3 | Launch activation box | Enter your key into the license dialog. 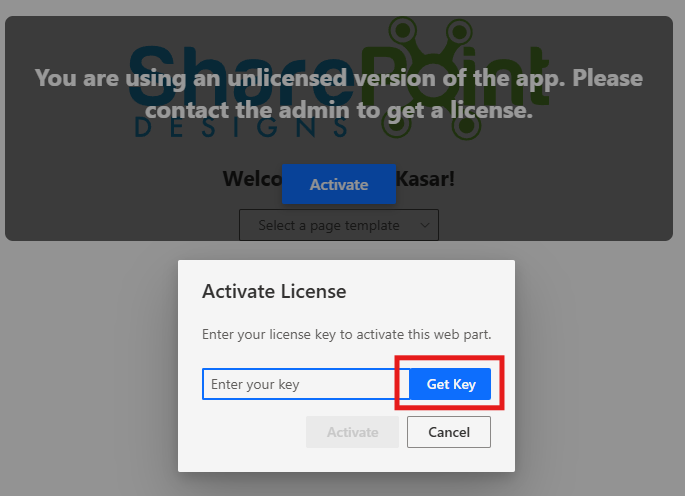 |
| 4 | Click Get Key | You'll be redirected to the license purchase page. |
| 5 | Complete purchase | A license key will be emailed to you. Check your spam/junk folders. |
| 6 | Paste and activate | Return to SharePoint, enter the key, and click Activate. |
✅ You're all set! Design 5 is now fully activated.
✅ Lists & Libraries Created Automatically
The following resources are provisioned upon applying the Home template:
- 📄 Quick Links (List)
- 📄 AnnouncementList (List)
- 🖼️ Welcome Banner (Library)
- 🖼️ Event Flyer (Library)
Mock data is also auto-added for:
- Company & Announcements (Featured News)
- Quick Links
- Events
No manual configuration required.
🔍 Validate Each Web Part on the Provisioned Page
HOME PAGE
| Webpart | Description | | ------------------------------ | ----------------------------------------------------------------------------------------------------------- | --------------------------------------------- | --- | | 👋 Welcome Banner | Personalized greeting with user's name and live date/time. Banner carousel can be configured via a library. | | 🎥 CEO Video | Add a custom video message from leadership. Supports embed and upload. | | 📰 Company & Announcements | Combined Featured News section showing company updates and announcements. | | 📅 Calendar | Highlights upcoming events, meetings, or holidays. | | 🖼️ Events Flyer | Visual spotlight for featured events — static or linked image banner. | | 📄 Documents | List or tile-based document links for easy access. | | 🔗 Quick Links | Essential tools and links grouped with icons and labels. | | |
🧹 Uninstall Guide
To uninstall DIY Design 5 by SharePoint Designs:
- Go to Site Contents.
- Find Design 5 by SharePoint Designs in the installed apps list.
- Click the ellipsis (···) → choose Remove.
- If Classic Experience is prompted, follow it and confirm removal again.
🛠️ Troubleshooting Common Issues
⚠️ Top Bar Icon Not Showing
Solution: Make sure the app was added correctly. Refresh your browser or try a hard reload (Ctrl + Shift + R).
🗃️ Lists/Library Not Created
Solution: Confirm that you selected "Home" in the panel and clicked Apply Template. Retry if needed.
📝 Mock Data Missing
Solution: Reapply the template or manually add a few items to test functionality.
🌟 Best Practices
🔁 Content Maintenance
- Update banners, events, and quick links regularly.
- Remove outdated documents and announcements.
🎓 User Enablement
- Train content managers on maintaining web parts.
- Provide quick internal docs or video walkthroughs.
🔐 Permissions & Governance
- Keep editing rights limited to owners.
- Review user access to ensure data security.
🗣️ Collect Feedback
- Add a “Send Feedback” link to improve engagement.
- Use a list to track and act on suggestions.
🧑💼 User Permissions
| Role | Permissions |
|---|---|
| Owners | Full control — manage app, lists, license, settings. |
| Members | Contribute content such as links, documents, events. |
| Visitors | Read-only access. General audience viewing. |
Stick to the least privilege principle. Review permissions regularly.
🆘 Support
Need help? Contact SharePoint Designs:
🌐 www.sharepointdesigns.com
📧 support@sharepointdesigns.com